Venture Shape
Implementing Astro Content Layer and Image Optimization
How I upgraded my Astro site with v5, implemented the Content Layer, and transitioned from Cloudinary to Astro’s Image component with a new storage solution.
January 4, 2025
Matt Dennis
I spent a bit of time yesterday updating my Astro site Venture Shape to move away from using Cloudinary and instead take advantage of Astro’s Image component. To make this happen I needed to update Astro to v5, convert my Insights (that’s the name of this blog) to the new Astro Content Layer, and decide on a new image storage solution. Let’s walk through the steps and maybe it can help you implement a similar solution.
In This Article :
Status of My Insight Articles Before Making Changes
This site is pretty small and to save time when I first built the site, I didn’t set up a content collection at all for my Insights. Instead, I just created an Insights folder in my pages directory and added the Markdown files there. This made sense as I only had a few articles. Note that you don’t need to do this step if you’re planning to follow along and implement the content layer. I’m just showing where I started from.
The initial structure was something like this:
// ventureshape.com partial directory structure

src/
├── components/
│   ├── Header.astro
│   ├── Footer.astro
├── pages/
│   ├── insights/ // [!code highlight]
│   │   ├── article-1.md
│   │   ├── article-2.md
│   │   ├── article-n.md
├── layouts/
│   ├── Layout.astro
│   ├── InsightsSingle.astro
Each Insight article contains frontmatter like this:
---
layout: ../../layouts/InsightsSingle.astro
title: 'Optimizing Your Biotech Website to Attract Your Next Funding Round'
pubDate: 2024-09-13
description: 'Learn how to optimize your biotech website to attract investors and secure your next funding round with clear messaging and strategic design.'
categories: 'Design and User Experience'
tags:
heroImgUrl: 'https://res.cloudinary.com/ventureshape/image/upload/w_auto,c_scale,q_auto/v1726271133/venture-shape/Insights/web-design-funding.webp' // [!code highlight]
ogUrl: https://ventureshape.com/insights/is-your-biotech-website-helping-secure-next-funding-round/
canonPath: /insights/is-your-biotech-website-helping-secure-next-funding-round/
---
From there, the InsightsSingle.astro layout could use the frontmatter content to populate everything needed for displaying a single Insights article. Setting up the articles the way I did initially was just a time saver and is not recommended for sites that are planning to have lots of articles.
Implementing Astro Content Layer
From the Astro Content collections docs, “Content collections are the best way to manage sets of content in any Astro project. Collections help to organize and query your documents, enable Intellisense and type checking in your editor, and provide automatic TypeScript type-safety for all of your content. Astro v5.0 introduced the Content Layer API for defining and querying content collections. This performant, scalable API provides built-in content loaders for your local collections. For remote content, you can use third-party and community-built loaders or create your own custom loader and pull in your data from any source.”
Refactoring the Insights Location
The first thing I needed to do was refactor my directory structure so that my Insights were moved out of the pages directory and into their own directory in /src. This is because the articles are no longer pages as far as Astro is concerned. They are now a content collection and must be in their own directory outside of pages. Note that pages are used for routing in Astro and the Content Layer API is going to handle routing of collections for us. Here’s the change:
// ventureshape.com partial directory structure

src/
├── components/
│   ├── Header.astro
│   ├── Footer.astro
├── pages/
│   ├── insights/ // [!code --]
│   │   ├── article-1.md // [!code --]
│   │   ├── article-2.md // [!code --]
│   │   ├── article-n.md // [!code --]
├── insights/ // [!code ++]
│   ├── article-1.md // [!code ++]
│   ├── article-2.md // [!code ++]
│   ├── article-n.md // [!code ++]
├── layouts/
│   ├── Layout.astro
│   ├── InsightsSingle.astro
Create content.config.ts to define our collection
Next we create content.config.ts to define the collection per the Astro docs.
This file goes in the src directory and should now look like this:
// ventureshape.com partial directory structure

src/
├── components/
│   ├── Header.astro
│   ├── Footer.astro
├── pages/
│   ├── somepage.astro
├── insights/
│   ├── article-1.md
│   ├── article-2.md
│   ├── article-n.md
├── layouts/
│   ├── Layout.astro
│   ├── InsightsSingle.astro
├── content.config.ts // [!code highlight]
The content.config.ts file will contain:
//content.config.ts

// 1. Import utilities from `astro:content`
import { defineCollection, z } from 'astro:content';

// 2. Import loader(s)
import { glob } from 'astro/loaders';

// 3. Define your collection(s)
const insights = defineCollection({
  loader: glob({ pattern: "**/*.md", base: "./src/insights" }),
  schema: ({ image }) => z.object({
    layout: z.string().optional(),
    title: z.string().optional(),
    pubDate: z.coerce.date(),
    description: z.string().optional(),
    categories: z.union([z.string(), z.array(z.string())]).optional(),
    tags: z.union([z.array(z.string()), z.null()]).optional(),
    heroImgUrl: image(),
    ogUrl: z.string().url().optional(),
    canonPath: z.string().optional(),
  })
 });

// 4. Export a single `collections` object to register your collection(s)
export const collections = { insights };
There are a few things to note about this content.config.ts:
- Line 12: The schema function uses a destructured parameter to extract image directly from the utilities passed into the function.
- Line 19: heroImgUrl uses image() which is the Image component
In the next few days, I’ll be optimizing the ogURL and canonPath parts of the schema. They both provide access to the Insight url and it’s redundant to have both. Ignore it for now.
Set up a file to generate routes from our content
Originally, when Insights were in the pages directory, Astro generated the routes automatically as that’s exactly what the pages directory is for. With the Insights now in its own folder as a content collection, we need to do some extra work to get our route functionality back.
You can find this information in the Astro docs (Building for static output in Content Collections) a bit further down from where we were.
I created a file and directory in /src/pages/insights/[slug].astro which is the convention for setting up content collection routing according to the docs.
// /src/pages/insights/[slug].astro code fence
---
import { getCollection, render } from "astro:content";
import { Image } from "astro:assets";
import Layout from "../../layouts/Layout.astro";
import ContactCTA from "../../components/global/ContactCTA.astro";

// 1. Generate a new path for every collection entry
export async function getStaticPaths() {
  const posts = await getCollection("insights");
  return posts.map((post) => ({
    params: { slug: post.id },
    props: { post },
  }));
}

// 2. For your template, you can get the entry directly from the prop
const { post } = Astro.props;
const { Content } = await render(post);
---
In this file we import the collection API, the Image component, our Layout and a ContactCTA component that I use at the bottom of the page. Don’t worry about the ContactCTA component - its not relevant and you can leave it out if you’re following along.
The getStaticPaths function let’s us create multiple pages from a single page component during the build step. In other words, when we (or our host) run npm run build, getStaticPaths will look at this [slug].astro and use it as the template for creating the individual pages for whatever collection we’re requesting in await getCollection() which in this case is insights.
Display content in our new [slug].astro file
// /src/pages/insights/[slug].astro (below code fence)
<Layout
  title={post.data.title}
  description={post.data.description}
  ogTitle={post.data.title}
  ogDescription={post.data.description}
  ogUrl={post.data.ogUrl}
  ogImage={post.data.heroImgUrl.src}
  frontmatter={post.data}
  canonPath={post.data.canonPath}>
  <div class="relative mt-[-5.5rem] border-b border-[#333]">
    <Image
      class="block object-cover object-center w-full h-full min-h-[30rem] lg:aspect-[1920/800] xl:max-h-[40rem]"
      src={post.data.heroImgUrl}
      alt={post.data.title ?? "Venture Shape Image"}
      width="1920"
      height="1280"
    />
    <div
      class="absolute bg-black top-0 left-0 w-full h-full object-cover opacity-[85%]">
    </div>
    <div class="container relative insights-single mx-auto max-w-[48.5rem]">
      <div
        class="container absolute left-0 bottom-0 flex justify-between items-end w-full max-w-[90rem] mx-auto">
        <div class="max-w-[40rem]">
          <p class="mb-0 insights-date">{formattedDate} | Matt Dennis</p>
          <h1>{post.data.title}</h1>
        </div>
      </div>
    </div>
  </div>
  <div class="insights-single container my-8 mx-auto max-w-[48.5rem]">
    <article>
      <Content />
    </article>
  </div>
  <ContactCTA />
</Layout>
We first add our Layout and all of it’s props using the prop from our code fence. Then we write all of the HTML (and Tailwind in this case) that will display our page.
You’ll see the Astro Image component starting on line 12. This is going to pull values from the code fence in our Markdown file (/insights/*.md), which was initially shown near the top of this article. The heroImgUrl was initially a link to an image hosted on Cloudinary. We want to update that:
---
layout: ../../layouts/InsightsSingle.astro
title: 'Optimizing Your Biotech Website to Attract Your Next Funding Round'
pubDate: 2024-09-13
description: 'Learn how to optimize your biotech website to attract investors and secure your next funding round with clear messaging and strategic design.'
categories: 'Design and User Experience'
tags:
heroImgUrl: 'https://res.cloudinary.com/ventureshape/image/upload/w_auto,c_scale,q_auto/v1726271133/venture-shape/Insights/web-design-funding.webp' // [!code --]
heroImgUrl: '../images/7-key-elements.webp' // [!code ++]
ogUrl: https://ventureshape.com/insights/is-your-biotech-website-helping-secure-next-funding-round/
canonPath: /insights/is-your-biotech-website-helping-secure-next-funding-round/
---
In this case, we’re replacing the Cloudinary link with a link to a local file stored in the /src/images/ directory. We can use a link from anywhere an image is stored. I’m planning to move from Cloudinary to Digital Ocean Spaces now that I have the content collection and image component working.
The Purpose of Image Optimization
Images are usually the largest assets that need to download on a webpage, so optimizing the images to make them as small as possible (while still having desired resolution) is one of the primary means for improving page performance.
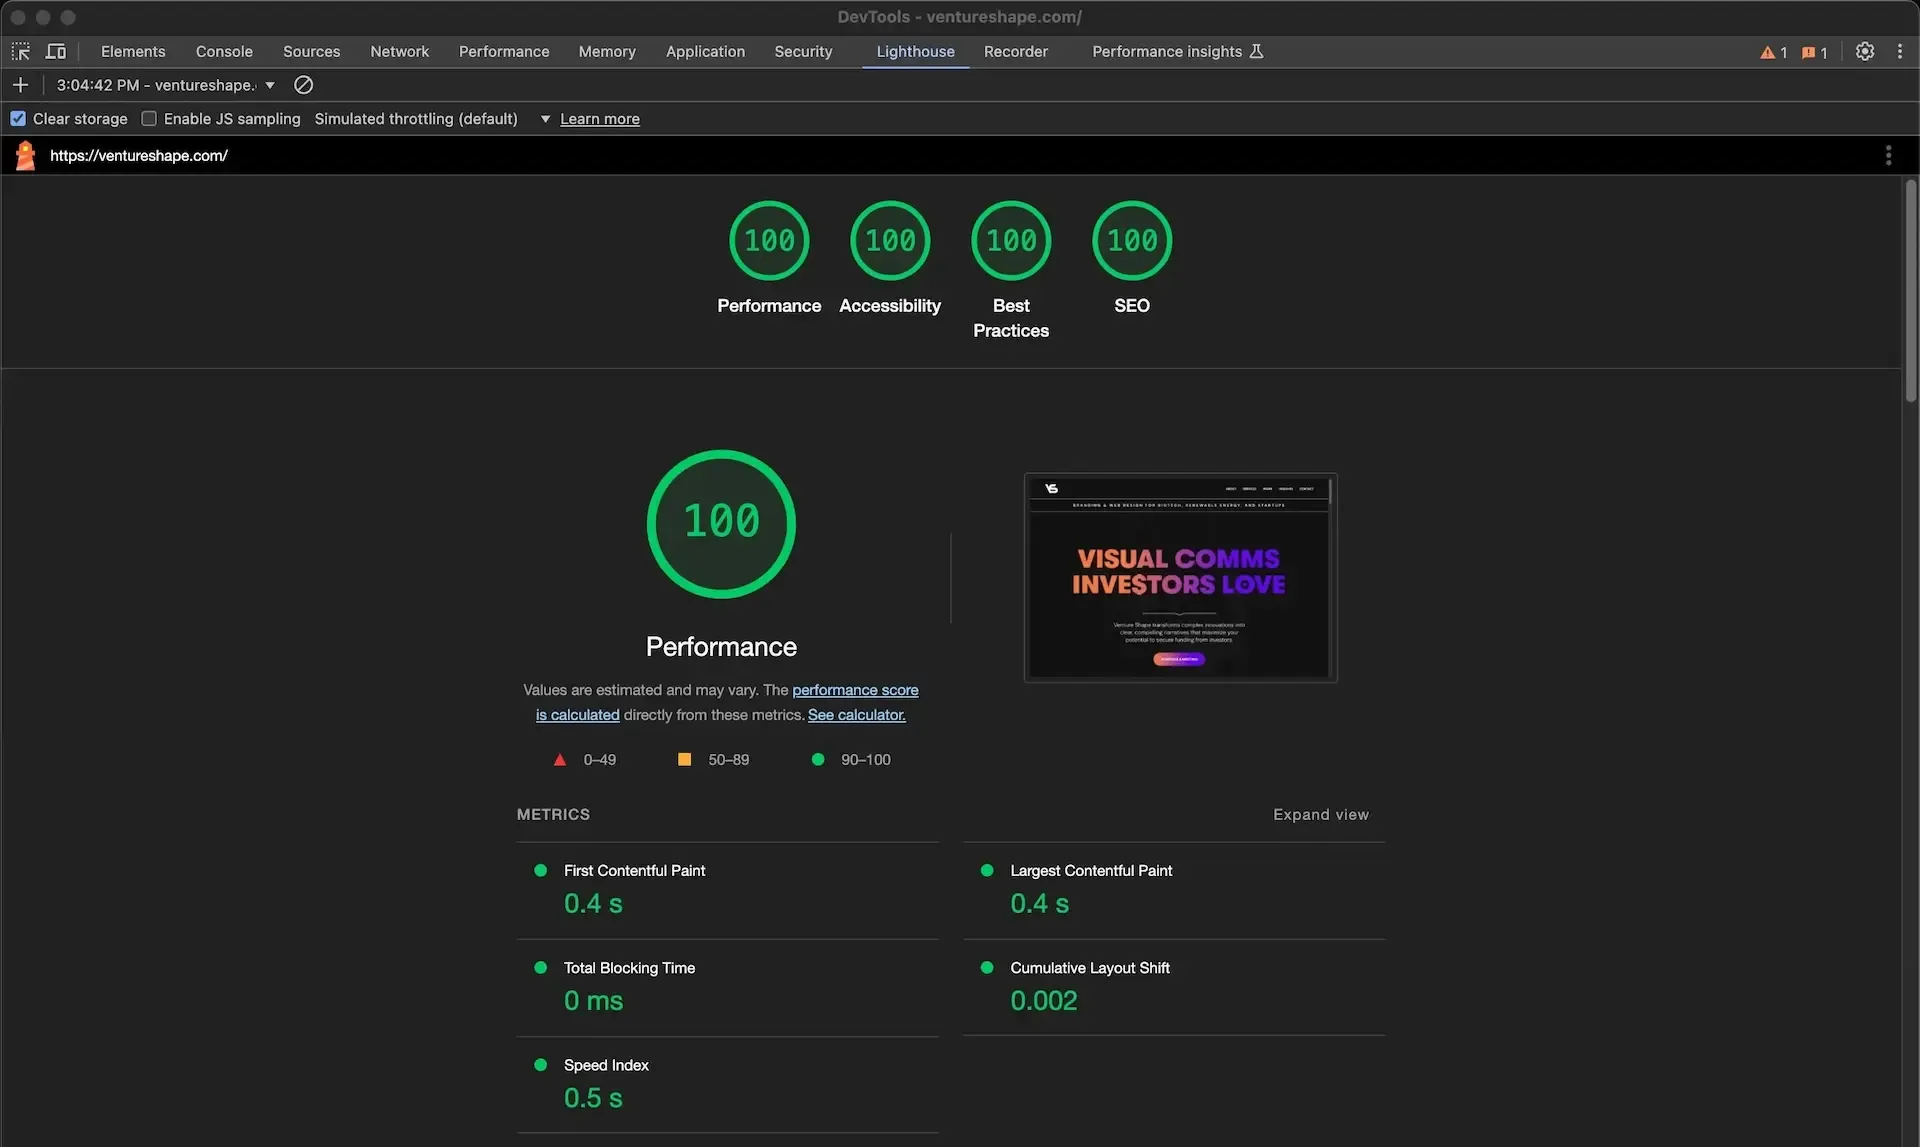
We want to see this when we run our website through Google’s PageSpeed Insights:

If our images are too large, the Performance metric in PageSpeed Insights will take a hit, indicating that our site is loading much slower than it would if the images were at optimal size. It doesn’t take much for this score to be abysmal and negatively impact search results.
Manually optimizing images and creating the sizes needed for various device widths is a time-consuming and error-prone task multiplied by every image on a website. So we have modern tools for managing this task for us. Cloudinary is one such tool for optimizing images.
Why I Decided To Leave Cloudinary
“Cloudinary Assets offers intelligent digital asset management for managing, transforming and delivering optimized images, videos and more.”
Cloudinary has been mostly great. But it’s a lot of kit for what I need to accomplish - managing images on smaller websites. I have been using their free plan for a few years. It includes 25GB of storage and a large library of presets to transform, size, crop, and color images.
Astro added an Image component in their v3.0.0 release which optimizes images, making these Cloudinary features unnecessary.
I decided to move away from Cloudinary for three reasons:
-
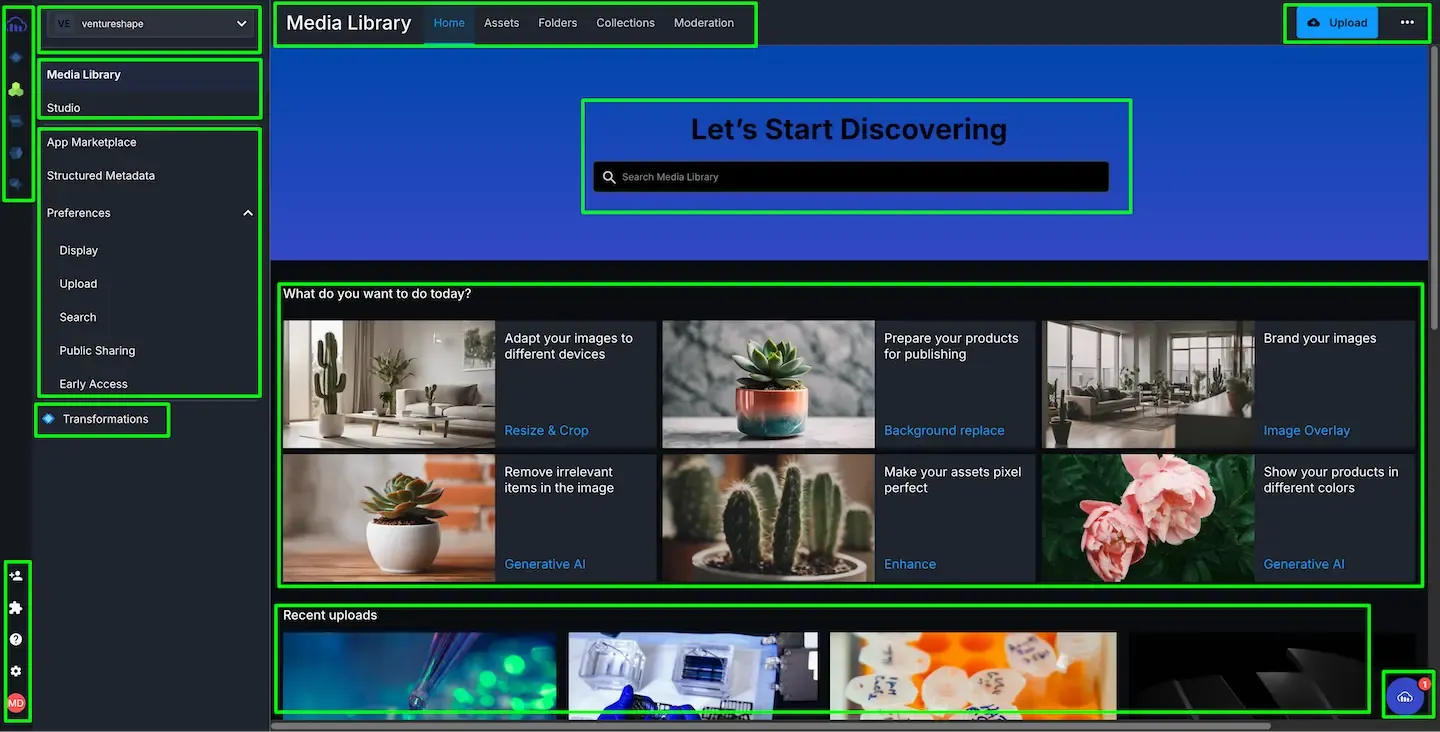
Cloudinary UI - Cloudinary seems more geared towards larger projects and enterprise-level solutions. It has an extensive set of configuration options. Their UI isn’t horrible but there’s just a lot going on. Every time I log in to add an image I’m reminded of just how many features there are that I’ll never use. The screenshot below is where we first land when logged in. The green boxes overlaying the screenshot show all the areas that can be clicked (a lot!):

-
Future Costs - I don’t want to pay for things I don’t use, like all those Cloudinary features. I just need a place to drop in image source files and then I can use the free solution offered by Astro…
-
Image Component - The Astro image component converts images into webp, lazy loads them, and allows you to set dimensions to stop Cumulative Layout Shift. Astro also includes a Picture component with even more features. The picture component displays responsive images and works with different formats and sizes.
Choosing a New Image Storage Solution
Given my decision to leave Cloudinary, I needed a reliable and cost-effective solution for hosting images. I just needed a place to drop in images, copy the URL, and add it to my Astro Image component. No frills. And With so few requirements this service should be inexpensive. It’s just storage.
After some research, I narrow down my options to Amazon S3 or DigitalOcean Spaces.
Option 1: Amazon S3
Amazon S3 is powerful and feature-rich, but it felt like overkill for my project. While it offers lots of scalability and integration options, it also comes with complexity: managing permissions, bucket policies, and dealing with unpredictable pricing tied to traffic spikes or potential abuse. For smaller projects like mine, managing unexpected costs made S3 less appealing. I also didn’t want any of the management overhead.
Options 2: DigitalOcean Spaces
DigitalOcean Spaces, on the other hand, stood out for its simplicity and flat-rate pricing model. It offered everything I needed: straightforward setup and predictable costs. For just $5 per month I could get up to 100 buckets of storage (allowing me to isolate storage for 100 websites for security and organization purposes), 250GB of storage and 1TiB of outbound transfer (meaning that about 1.1 terabytes of download bandwidth is available).
I’ll quickly point out here that I’m not affiliated with Digital Ocean at all. This solution just meets my needs.
Ultimately, I chose DigitalOcean Spaces because it struck the right balance between functionality and ease of use. It provided enough power for my needs without the added complexity and potential downsides of Amazon S3. For hosting images that are optimized through Astro’s component, DigitalOcean Spaces turned out to be the perfect fit.
Conclusion
Here’s a summary of the steps we took:
- Move Insights directory and its markdown files out of the pages directory and into the src directory (this step isn’t necessary in a fresh Astro install)
- Create content.config.ts in the src directory. This file defines our Insights collection.
- Create the
[slug].astrofile insrc/pages/insights/[slug].astroto generate routes from our content (in its code fence) and display the individual Insights page content. The Astro Image component is implemented in this file.